All in One View
Content from Hello-Scraping
Last updated on 2026-01-26 | Edit this page
Estimated time: 50 minutes
Overview
Questions
- What’s behind a website, and how can I extract information from it?
- What ethical and legal considerations should I keep in mind before scraping a website?
Objectives
- Identify the structure and key components of an HTML document.
- Use BeautifulSoup to locate elements, tags, attributes, and text within an HTML page.
- Recognize situations where web scraping is inappropriate or not permitted for accessing data.
Introduction
This workshop is a continuation of our Introduction to Web Scraping workshop. If you’re looking for a gentler introduction that uses XPath and the Scraper Chrome extension, take a look at the workshop materials for that workshop.
For recall, Web scraping is necessary when websites do not offer any interface to automate information or data retrieval via Web services, such as REST or SOAP, or any Application Programming Interfaces (APIs). Therefore, it is necessary to “scrape” the information embedded in the website itself.
When you want to extract information or download data from a website that is too large for efficient manual downloading or needs to be frequently updated, you should first:
- Check if the website has any available Web services or if APIs have been developed to this end
- Check if any R (or other language you know) package has been developed by others as a wrapper around the API to facilitate the use of these Web services
- Nothing found? Well, let’s code this ourselves then!
Here, we’ll revisit some of those core ideas to build a more hands-on understanding of how content and data are structured on the web. We’ll start by exploring what HTTP (Hypertext Transfer Protocol) and HTML (Hypertext Markup Language) are, and how HTML uses tags to organize and format content in a website. Then, we’ll introduce the BeautifulSoup library to parse HTML and make it easier to search for and extract specific elements from a webpage.
We’ll begin with simple examples and gradually move on to scraping more complex, real-world websites.
Be respectful
When scraping data, it is essential to adhere to two main guidelines:
- Data Privacy and Confidentiality: Always confirm that the data being collected is publicly available and contains no personal or confidential information.
- Server Load: Avoid overwhelming the web server. When collecting large amounts of data, best practice is to insert pauses between requests to allow the server to manage other traffic.
HTTP: Hypertext Transfer Protocol quick overview
URL
At the heart of web communications is the request message, which is
sent via Uniform Resource Locators (URLs).
Basic URL structure:
), port (1234), resource path (/path/to/resource), and query (?a=b&x=y)](../fig/http1-url-structure.png)
The protocol is typically http or https for secure communications. The default port is 80, but one can be set explicitly, as illustrated in the above image. The resource path is the local path to the resource on the server.
Request

The actions that should be performed on the host are specified via HTTP verbs. Today we are going to focus on two actions that are often used in web forms:
-
GET: fetch an existing resource. The URL contains all the necessary information the server needs to locate and return the resource. -
POST: create a new resource. POST requests usually carry a payload that specifies the data for the new resource.
HTML quick overview
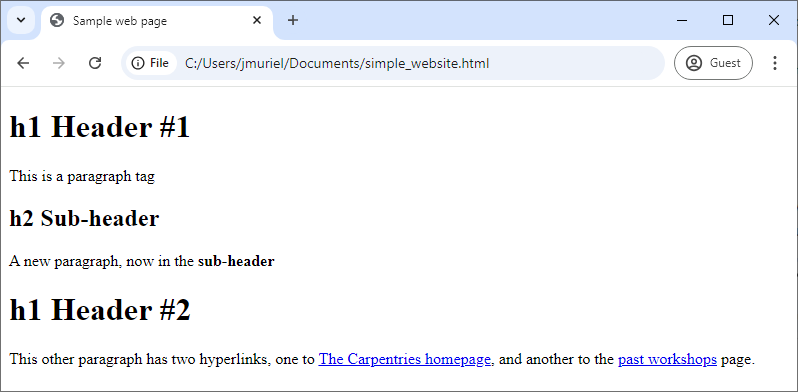
All websites have a Hypertext Markup Language (HTML) document behind them. Below is an example of HTML for a very simple webpage that contains just three sentences. As you look through it, try to imagine how the website would appear in a browser.
HTML
<!DOCTYPE html>
<html>
<head>
<title>Sample web page</title>
</head>
<body>
<h1>h1 Header #1</h1>
<p>This is a paragraph tag</p>
<h2>h2 Sub-header</h2>
<p>A new paragraph, now in the <b>sub-header</b></p>
<h1>h1 Header #2</h1>
<p>
This other paragraph has two hyperlinks,
one to <a href="https://carpentries.org/">The Carpentries homepage</a>,
and another to the
<a href="https://carpentries.org/workshops/past-workshops/">past workshops</a> page.
</p>
</body>
</html>
If you save that text in a file with a .html extension —using a simple text editor like Notepad on Windows or TextEdit on macOS— and open it in your web browser, the browser will interpret the markup language and display a nicely formatted web page.
When you open an HTML file in your browser, what it’s really doing is
reading a structured document made up of elements, each
marked by tags inside angle brackets (< and >).
For instance, the HTML root element, which delimits the beginning and
end of an HTML document, is identified by the <html>
tag.
Most elements have both an opening tag and a closing tag, which
define the start and end of that element. For example, in the simple
website we looked at earlier, the head element begins with
<head> and ends with </head>.
Because elements can be nested inside one another, an HTML document forms a tree structure, where each element is a node that can contain child nodes, as illustrated in the image below.

Finally, we can define or modify the behavior, appearance, or
functionality of an element using attributes.
Attributes appear inside the opening tag and consist of a name and a
value, formatted like name="value".
For example, in the simple website, we added a hyperlink using the
<a>...</a> tags. To specify the destination
URL, we used the href attribute inside the opening
<a> tag like this:
<a href="https://carpentries.org/workshops/past-workshops/">past workshops</a>.
Here is a non-exhaustive list of common HTML elements and their purposes:
-
<hmtl>...</html>: The root element that contains the entire document. -
<head>...</head>: Contains metadata such as the page title that the browser displays. -
<body>...</body>: Contains the content that will be shown on the webpage. -
<h1>...</h1>, <h2>...</h2>, <h3>...</h3>: Define headers of levels 1, 2, 3, and so on. -
<p>...</p>: Represents a paragraph. -
<a href="">...</a>: Creates a hyperlink; the destination URL is set with the href attribute. -
<img src="" alt="">: Embeds an image, with the image source specified bysrcand alternative text provided byalt. It doesn’t have an opening tag. -
<table>...</table>, <th>...</th>, <tr>...</tr>, <td>...</td>: Define a table structure, with headers (<th>), rows (<tr>), and cells (<td>). -
<div>...</div>: Groups sections of HTML content together. -
<script>...</script>: Embeds or links to JavaScript code.
In the list above, we mentioned some attributes specific to hyperlink
(<a>) and image (<img>) elements,
but there are also several global attributes that most HTML elements can
have. These are especially useful for identifying elements when web
scraping:
-
id="": Assigns a unique identifier to an element; this ID must be unique within the entire HTML document. -
title="": Provides extra information about the element, shown as a tooltip when the user hovers over it. -
class="": Applies a common styling or grouping to multiple elements at once.
To summarize: elements are identified by tags, and attributes let us assign properties or identifiers to those elements. Understanding this structure will make it much easier to extract specific data from a website.
Parsing HTML with BeautifulSoup
Now that we understand how a website is structured, we can begin
extracting information from it. The BeautifulSoup package
is our main tool for this task —it parses the HTML so we can
programmatically search for and access the elements we need.
To see how BeautifulSoup works, we’ll use the simple website example
from earlier. As a first step, we’ll load the BeautifulSoup
package along with Pandas.
Let’s store the HTML content in a string variable named
example_html.
PYTHON
example_html = """
<!DOCTYPE html>
<html>
<head>
<title>Sample web page</title>
</head>
<body>
<h1>h1 Header #1</h1>
<p>This is a paragraph tag</p>
<h2>h2 Sub-header</h2>
<p>A new paragraph, now in the <b>sub-header</b></p>
<h1>h1 Header #2</h1>
<p>
This other paragraph has two hyperlinks,
one to <a href="https://carpentries.org/">The Carpentries homepage</a>,
and another to the
<a href="https://carpentries.org/workshops/past-workshops/">past workshops</a> page.
</p>
</body>
</html>
"""We parse the HTML by passing it to the BeautifulSoup()
function, specifying html.parser as the parser. This
creates an object that represents the document as a nested data
structure —similar to the tree structure we discussed earlier. Using the
.prettify() method on this object displays the HTML with
indentation that reflects its nested structure, making it easier to
read.
OUTPUT
<!DOCTYPE html>
<html>
<head>
<title>
Sample web page
</title>
</head>
<body>
<h1>
h1 Header #1
</h1>
<p>
This is a paragraph tag
</p>
<h2>
h2 Sub-header
</h2>
<p>
A new paragraph, now in the
<b>
sub-header
</b>
</p>
<h1>
h1 Header #2
</h1>
<p>
This other paragraph has two hyperlinks, one to
<a href="https://carpentries.org/">
The Carpentries homepage
</a>
, and another to the
<a href="https://carpentries.org/workshops/past-workshops/">
past workshops
</a>
.
</p>
</body>
</html>Now that our soup variable holds the parsed document, we
can use the .find() and .find_all() methods to
search for elements.
.find()looks for the first occurrence of a specified tag and returns the entire element, including its opening and closing tags.If multiple elements share the same tag,
.find()returns only the first one.To get all matching elements, use
.find_all(), which returns a list of all elements with the specified tag.To extract just the text inside an element and all its children, use the
.get_text()method..find()will search the tag that we specify, and return the entire element, including the starting and closing tags.
Below, you’ll see examples of how these commands work with our simple website.
PYTHON
print("1.", soup.find('title'))
print("2.", soup.find('title').get_text())
print("3.", soup.find('h1').get_text())
print("4.", soup.find_all('h1'))
print("5.", soup.find_all('a'))
print("6.", soup.get_text())OUTPUT
1. <title>Sample web page</title>
2. Sample web page
3. h1 Header #1
4. [<h1>h1 Header #1</h1>, <h1>h1 Header #2</h1>]
5. [<a href="https://carpentries.org/">The Carpentries homepage</a>, <a href="https://carpentries.org/workshops/past-workshops/">past workshops</a>]
6.
Sample web page
h1 Header #1
This is a paragraph tag
h2 Sub-header
A new paragraph, now in the sub-header
h1 Header #2
This other paragraph has two hyperlinks,
one to The Carpentries homepage,
and another to the
past workshops page.How would you extract all hyperlinks identified with
<a> tags? In our example, we see that there are only
two hyperlinks, and we could extract them in a list using the
.find_all('a') method.
OUTPUT
Number of hyperlinks found: 2
[<a href="https://carpentries.org/">The Carpentries homepage</a>, <a href="https://carpentries.org/workshops/past-workshops/">past workshops</a>]To access the value of a given attribute in an element, for example
the value of the href attribute in
<a href="">, we would use the .get()
method with the name of the attribute (i.e. .get('href')).
Let’s make a loop that prints only the URL for each hyperlink we have in
our example.
OUTPUT
https://carpentries.org/
https://carpentries.org/workshops/past-workshops/Challenge
Create a Python dictionary that has the following three items, containing information about the first hyperlink in the HTML of our example.
One way of completing the exercise is as follows.
PYTHON
first_link = {
'element': str(soup.find('a')),
'url': soup.find('a').get('href'),
'text': soup.find('a').get_text()
}An alternative and often more efficient approach is to first store
the result of soup.find('a') in a variable, rather than
calling it multiple times. This makes your code cleaner and avoids
redundant searches.
You can also start by creating an empty dictionary and then add key-value pairs to it. This is especially useful when you’re extracting multiple pieces of information in a loop, as you’ll likely want to build up a dictionary of results step by step.
To wrap up this introduction to HTML and BeautifulSoup, let’s write code that extracts all hyperlink elements in a structured way —capturing each link’s tag, destination URL, and display text.
We’ll start with the links variable we created earlier:
links = soup.find_all('a'). Then, we’ll loop through each
hyperlink element, store the three pieces of information in a
dictionary, and append each dictionary to a list called
list_of_dicts. At the end, we’ll have a list containing two
dictionaries —one for each link— which we can easily convert into a
Pandas DataFrame.
PYTHON
links = soup.find_all('a')
list_of_dicts = []
for item in links:
dict_a = {}
dict_a['element'] = str(item)
dict_a['url'] = item.get('href')
dict_a['text'] = item.get_text()
list_of_dicts.append(dict_a)
links_df = pd.DataFrame(list_of_dicts)
print(links_df)OUTPUT
element url text
0 <a href="https://carpentries.org/">The Carpent... https://carpentries.org/ The Carpentries homepage
1 <a href="https://carpentries.org/workshops/pas... https://carpentries.org/workshops/past-workshops/ past workshopsYou can find more detailed information about the BeautifulSoup package and its full range of methods in the BeautifulSoup Documentation.
The rights, wrongs, and legal barriers to scraping
The internet isn’t as open as it once was. What used to be a vast, freely accessible source of information has become a valuable reservoir of data —especially for training machine learning and generative AI models. In response, many social media platforms and website owners have either started monetizing access to their data or taken steps to protect their resources from being overwhelmed by automated bots.
As a result, it’s increasingly common for websites to include
explicit prohibitions against web scraping in their Terms of Service
(TOS). To avoid legal or ethical issues, it’s essential to check both
the TOS and the site’s robots.txt file before scraping.
You can usually find a site’s robots.txt file by
appending /robots.txt to the root of the domain—for
example: https://facebook.com/robots.txt (not
https://facebook.com/user/robots.txt). Both the TOS and
robots.txt will help you understand what is allowed and
what isn’t, so it’s important to review them carefully before
proceeding.
Challenge
Visit Facebook’s Terms of Service and its robots.txt file. What do they say about web scraping or collecting data using automated means? Compare it to Reddit’s TOS and Reddit’s robots.txt.
In addition to reviewing a website’s policies, you should also be aware of the laws that apply in your region —especially those related to copyright and data privacy. If you’re planning to collect a large amount of data for research or commercial purposes, it’s a good idea to seek legal advice before proceeding. If you’re affiliated with a university, there’s a good chance it has a copyright office or legal team that can help you navigate the legal aspects of your project. The university library is often a great starting point for finding support and guidance on copyright and data use.
To conclude, here is a brief code of conduct you should keep in mind when doing web scraping:
Ask nicely whether you can access the data in another way. If your project relies on data from a particular organization, consider reaching out to them directly or checking whether they provide an API. With a bit of luck, they might offer the data you need in a structured format —saving you time and effort.
-
Don’t download content that’s clearly not public. For example, academic journal publishers often impose strict usage restrictions on their databases. Mass-downloading PDFs can violate these rules and may get you —or your university librarian— into trouble.
If you need local copies for a legitimate reason (e.g., text mining), special agreements may be possible. Your university library is a good place to start exploring those options.
Check your local legislation. Many countries have laws protecting personal information, such as email addresses or phone numbers. Even if this data is visible on a website, scraping it could be illegal depending on your jurisdiction (e.g., in Australia).
Don’t share scraped content illegally. Scraping for personal use is often considered fair use, even when it involves copyrighted material. But sharing that data —especially if you don’t have the rights to distribute it— can be illegal.
Share what you can. If the scraped data is public domain or you’ve been granted permission to share it, consider publishing it for others to reuse (e.g., on datahub.io). Also, if you wrote a scraper to access it, sharing your code (e.g., on GitHub) can help others learn from and build on your work.
Publish your own data in a reusable way. Make it easier for others by offering your data in open, software-agnostic formats like CSV, JSON, or XML. Include metadata that describes the content, origin, and intended use of the data. Ensure it’s accessible and searchable by search engines.
-
Don’t break the Internet. Some websites can’t handle high volumes of requests. If your scraper is recursive (i.e., it follows links), test it first on a small subset.
Be respectful by setting delays between requests and limiting the rate of access. You’ll learn more about how to do this in the next episode.
Following these guidelines helps ensure that your scraping is ethical, legal, and considerate of the broader web ecosystem.
- Every website is built on an HTML document that structures its content.
- An HTML document is composed of elements, usually defined by an
opening
<tag>and a closing</tag>. - Elements can have attributes that define their properties, written
as
<tag attribute_name="value">. - We can parse an HTML document using
BeautifulSoup()and search for elements with the.find()and.find_all()methods.- We can extract the text inside an element with
.get_text()and access attribute values using.get("attribute_name").
- We can extract the text inside an element with
- Always review and respect a website’s Terms of Service (TOS) before scraping its content.
Content from Scraping a real website
Last updated on 2026-01-27 | Edit this page
Estimated time: 75 minutes
Overview
Questions
- How can I get the data and information from a real website?
- How can I start automating my web scraping tasks?
Objectives
- Use the
requestspackage to retrieve the HTML content of a website. - Navigate the tree structure behind an HTML document to extract the information we need.
- Understand how to avoid being blocked after sending too many requests.
It’s now time to extract information from an actual website: https://carpentries.org. We’ll focus on retrieving data about upcoming and past workshops taught by The Carpentries global community.
To give you a sense of how web scraping can be useful here, we might use this data to analyze which countries have hosted the most workshops, build a live dashboard showing recent trends in instruction, or even create an app that notifies us when a new workshop is scheduled in our region.
With the basic tools shown here, you can build similar apps and analyses using the website(s) you’re interested in. But always keep in mind the code of conduct from the previous episode, especially the first point: there might be an easier and more appropriate way to access the data you need.
In fact, for the example we’re about to explore, The Carpentries provides a list of data feeds that you can use to access information about upcoming and past workshops directly.
“Requests” the website HTML
In the previous episode we used a simple HTML document, not an actual
website. Now that we’re moving into a more realistic and complex
scenario, we’ll add another tool to our toolbox: the
requests package.
For this lesson, we’ll use requests solely to retrieve
the HTML content of a website. Keep in mind that requests
offers much more functionality, which you can explore in the Requests package
documentation.
We’ll be scraping The Carpentries website, specifically the pages
listing upcoming
and past workshops](https://carpentries.org/workshops/past-workshops/). To
do that, we’ll first load the requests package and then use the
.get(url) function and the .text property to
fetch and store the HTML content of the page.
Additionally, to simplify our navigation through the HTML document,
we’ll use the Regular
Expressions module re to remove all newline characters
(\n) and their surrounding whitespace. You can think of
this as a pre-processing or cleaning step. While we won’t go into detail
here, you can explore more about the topic in this by Library
Carpentry Introduction to Regular Expressions.
PYTHON
# Loading libraries
import requests
import re
from bs4 import BeautifulSoup
from time import sleep
import pandas as pd
from tqdm import tqdm
# Getting the HTML from our desired URL as a text string
url = 'https://carpentries.org/workshops/upcoming-workshops/'
req = requests.get(url)
# Checking if the request was successful
if req.status_code == 200:
req = req.text
# Cleaning and printing the string
cleaned_req = re.sub(r'\s*\n\s*', '', req).strip()
print(cleaned_req[0:1000])
else:
print(f"Failed to retrieve the webpage. Status code: {req.status_code}")OUTPUT
<!doctype html><html class=scroll-smooth lang=en-us dir=ltr><head><meta charset=utf-8><meta name=viewport content="width=device-width"><title>Upcoming workshops | The Carpentries</title><link rel=preconnect href=https://fonts.googleapis.com><link rel=preconnect href=https://fonts.gstatic.com crossorigin><link href="https://fonts.googleapis.com/css2?family=Mulish:ital,wght@0,200..1000;1,200..1000&display=swap" rel=stylesheet><script defer src=https://cdn.jsdelivr.net/npm/@glidejs/glide@3.5.x></script><script src=https://kit.fontawesome.com/3a6fac633d.js crossorigin=anonymous></script><link rel=stylesheet href=https://cdn.datatables.net/1.13.6/css/jquery.dataTables.min.css><script src=https://code.jquery.com/jquery-3.7.1.min.js></script><script src=https://cdn.datatables.net/1.13.6/js/jquery.dataTables.min.js></script><script src=https://cdn.jsdelivr.net/npm/moment@2.29.1/moment.min.js></script><script src=https://cdn.datatables.net/plug-ins/1.13.6/sorting/datetime-moment.js></script><scWe truncated the output to show only the first 1000 characters of the
document, as it’s too long to display fully. Still, we can confirm it’s
HTML and notice some elements that weren’t present in the earlier
example, such as <meta>, <link>
and <script> tags.
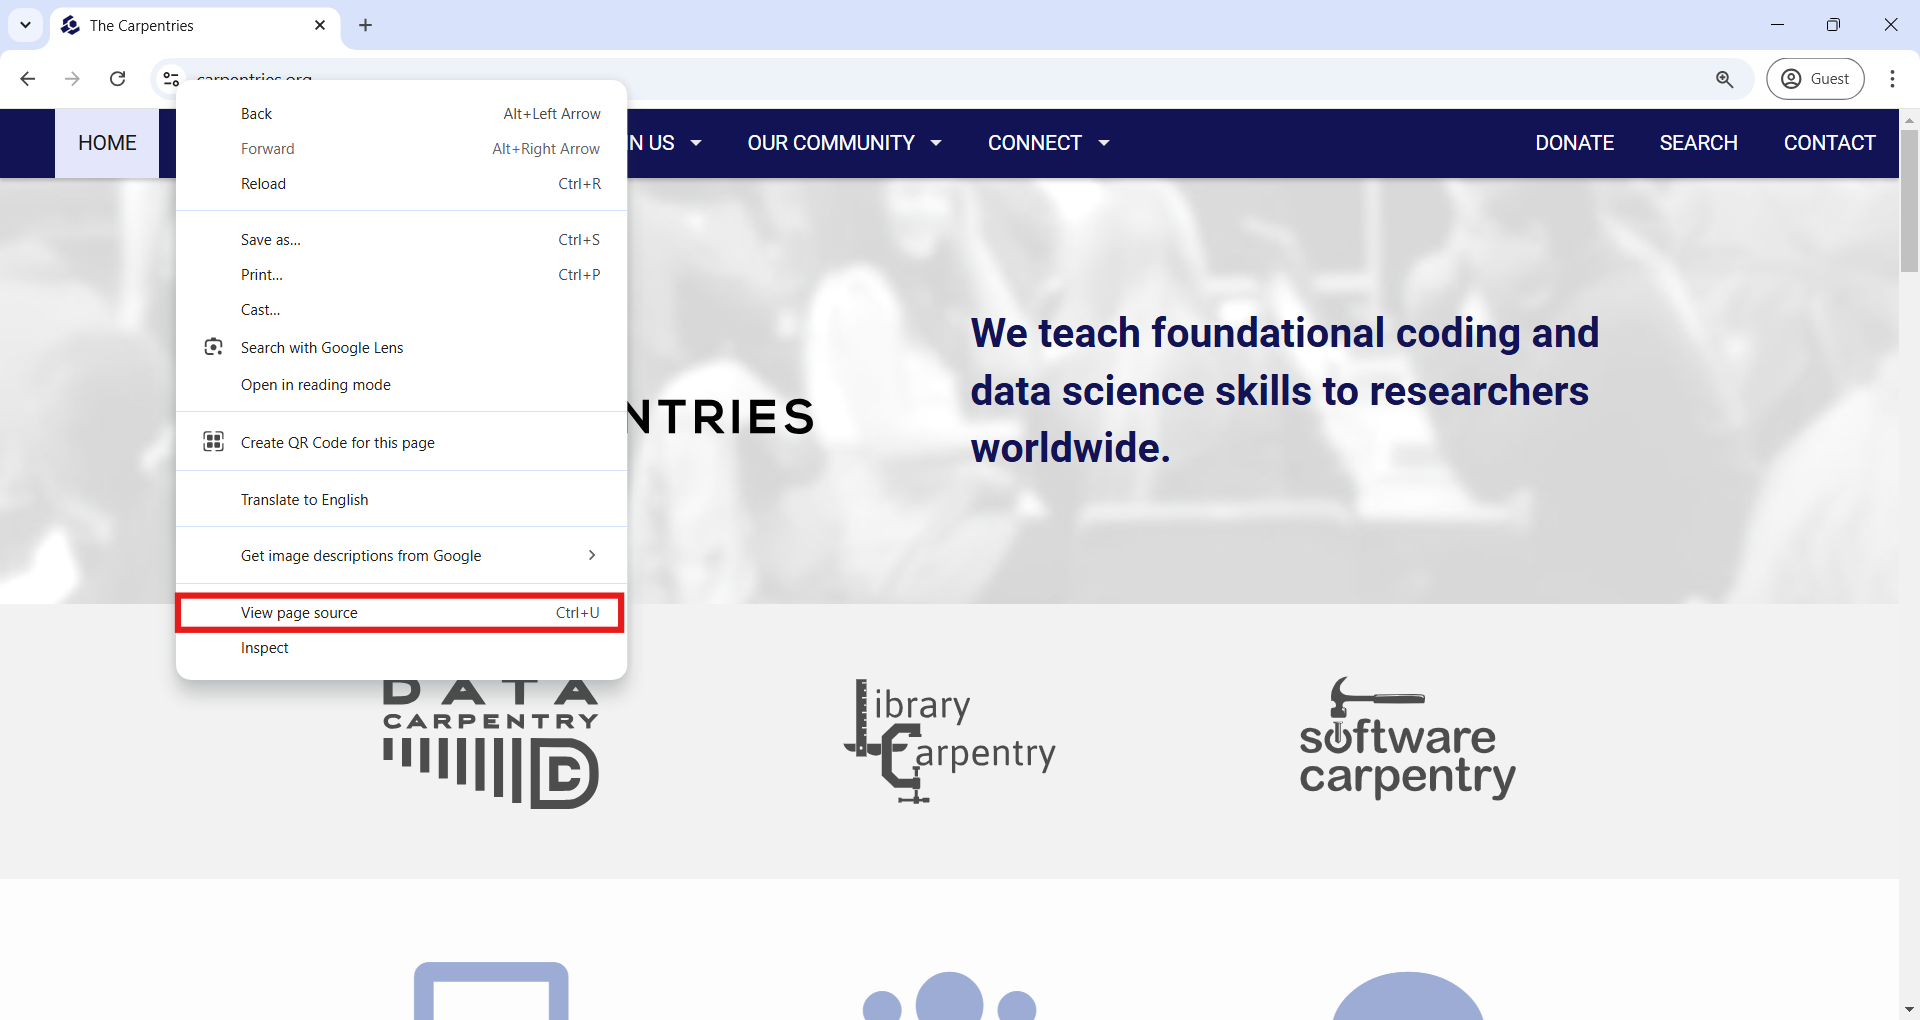
There’s also another way to view the HTML behind a website directly in your web browser. In Google Chrome, you can right-click anywhere on the page (on a Mac, hold the Control key while clicking), then choose “View page source” from the pop-up menu, as shown in the next image. If you don’t see that option, try clicking elsewhere on the page. A new tab will open showing the full HTML document for the site you were viewing.
In the HTML page source in your browser, you can scroll down to find
the first-level header (<h1>) with the text “Upcoming
workshops.” An easier way is to use the Find bar (press Ctrl + F on
Windows or Command + F on Mac) and search for “Upcoming workshops.”
From that point, you can read the surrounding HTML and compare it to
how the content appears on the rendered website. You’ll see how
formatting is handled through tags like unordered lists
(<ul>), list items (<li>),
paragraphs (<p>), and content divisions
(<div>).
Finding the information we want
However, carefully reading the entire HTML document to understand its structure and locate the workshop data would be time-consuming. Fortunately, modern web browsers offer a helpful tool called “Inspect”. With this tool, you can examine the specific HTML behind any element on a webpage.
To use it, right-click on the element you’re interested in (or hold the Control key and click, if you’re on a Mac), and then select “Inspect” from the pop-up menu.
Let’s try this with the first item in the Upcoming Workshops list, as shown in the screenshot below. (Keep in mind that your first listed workshop might differ, since the page is updated frequently.)
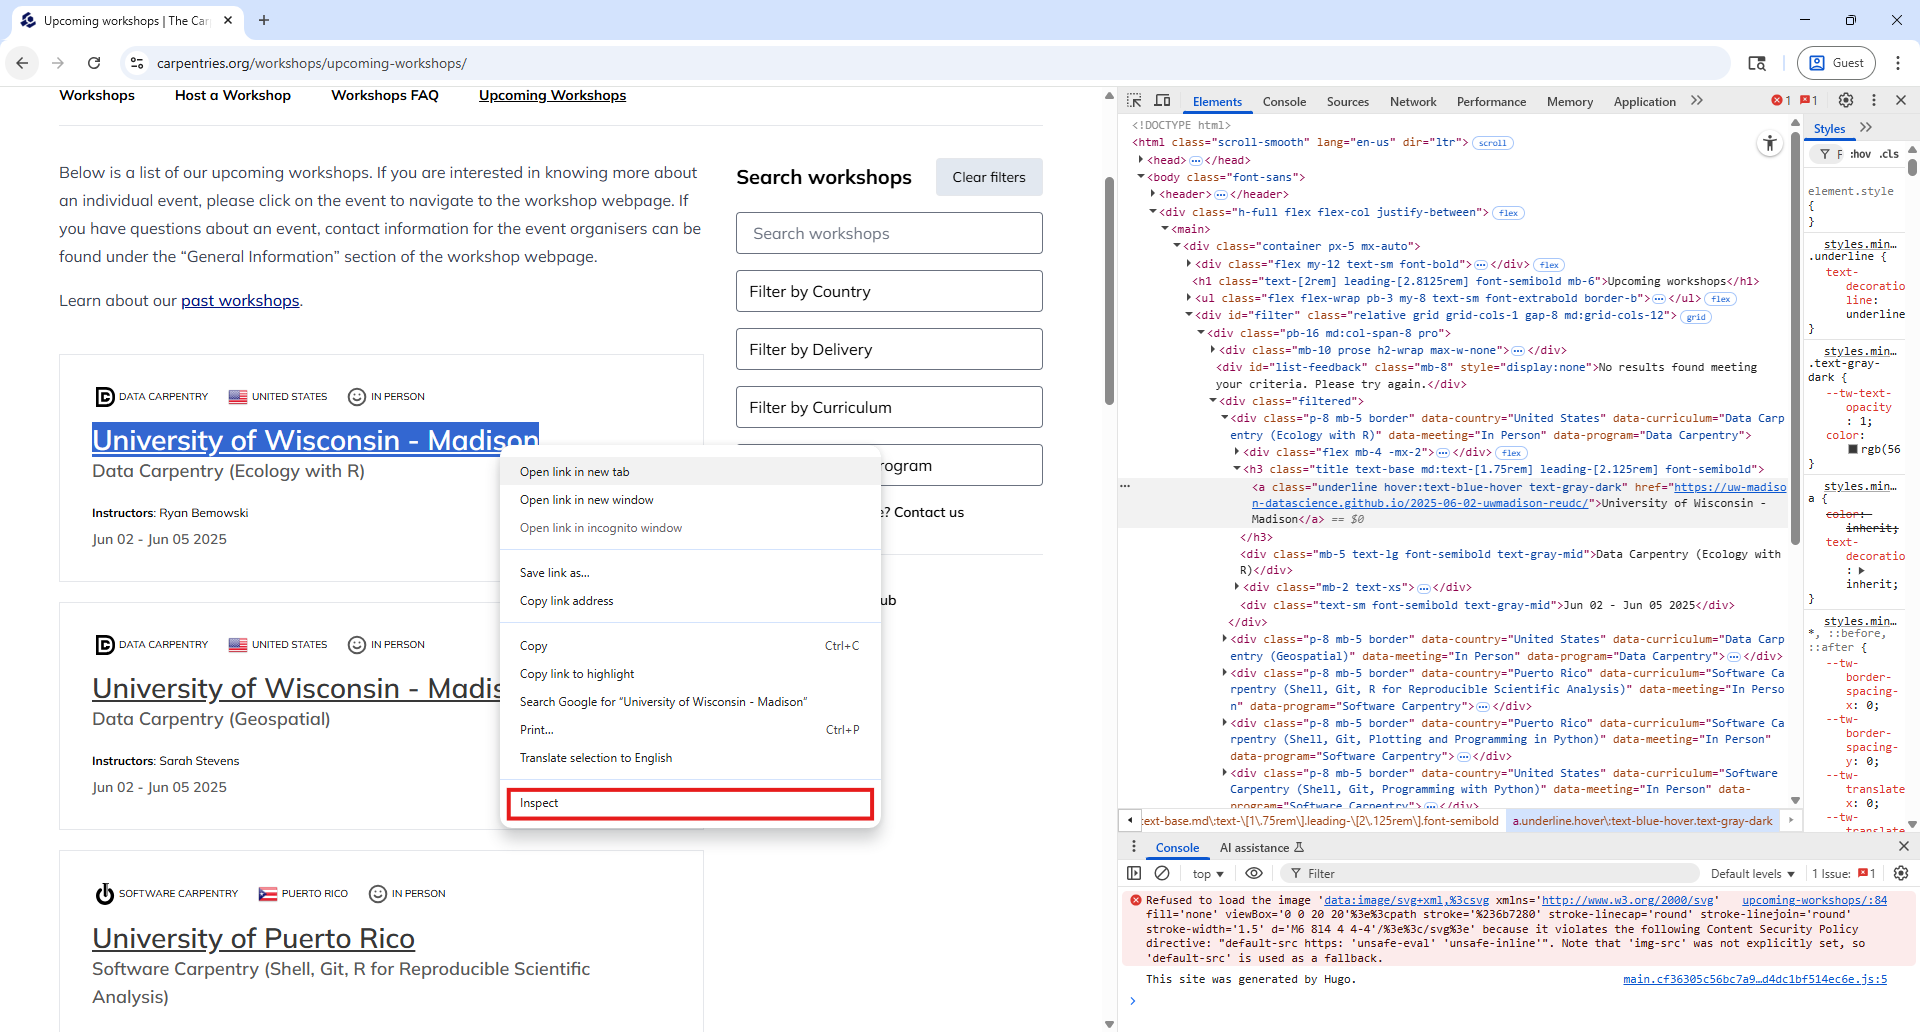
Using the Inspect feature opens DevTools on the side of your browser. DevTools offers a suite of tools for inspecting, debugging, and analyzing web pages in real-time. For this workshop, we’ll focus on just one: the “Elements” tab.
If you selected the organization name to inspect (as shown in the
screenshot), you’ll see an anchor (<a>) element
highlighted in the Elements tab. Around it, as its parent, you’ll find a
third-level header marked by <h3> tags. This provides
a visual example of the tree-like structure we discussed earlier,
elements nested inside other elements.
Back in our code, we left off after retrieving the HTML behind the
website using the requests package and storing it in a variable named
req.
Now, we can use the BeautifulSoup() function to parse
that HTML, just like we did before. The code below shows how we create
the soup object and use .find_all() to locate all the
third-level headers (<h3>) in the page.
PYTHON
# Parsing the HTML with BeautifulSoup
soup = BeautifulSoup(cleaned_req, 'html.parser')
# Finding all third-level headers and doing a formatted print
h3_by_tag = soup.find_all('h3')
print("Number of h3 elements found: ", len(h3_by_tag))
for n, h3 in enumerate(h3_by_tag, start=1):
print(f"Workshop #{n} - {h3.get_text()}")Besides searching elements by tag, it’s often useful to search using
attributes like id or class. In our case, we can see the h3
elements have a class attribute with multiple values: “title text-base
md:text-[1.75rem] leading-[2.125rem] font-semibold”. This set of classes
is used to apply styling, and it can help us target all elements that
share the same formatting.
So instead of selecting all <h3> tags directly, we
can search for elements with this specific class using the
class_ argument of .find_all(), like this:
PYTHON
# An alternative using the "class" attribute, instead of the h3 tag
h3_by_class = soup.find_all(class_="title text-base md:text-[1.75rem] leading-[2.125rem] font-semibold")This will give us the same elements as before, but demonstrates how to refine your search by class —an especially useful technique when different parts of a webpage use the same tag but serve different purposes.
Extracting data
Let’s go back to our web browser. Using the “Inspect” tool, can you
identify the parent of the first <h3> element?
If you guessed a content division element (a <div>
tag), you’re right! But exactly which <div> among all
those in the HTML? You’ll notice that this parent div
stands out because it has a class attribute attribute with
the value “p-8 mb-5 border”.
The animation below illustrates that all the information for each
workshop is grouped within a <div> element marked by
that same class attribute. It also shows how the “Inspect” tool
highlights the relevant portion of the webpage when you hover over an
HTML element, making it easier to understand the structure and pinpoint
the content you want to extract.

Understanding the tree structure of the HTML will help us navigate it
and extract the information we want. Navigating this tree is also
something we can do with BeautifulSoup. For example, let’s find the
parent of the first <h3> element using the
.parent property. As expected, this will return the
<div> element with the class attribute “p-8 mb-5
border”.
PYTHON
# Get the parent of the first h3 element and prettify it
div_firsth3 = h3_by_class[0].parent
print(div_firsth3.prettify())Remember, the output shown here is probably different than yours, as the website is continuously updated.
OUTPUT
<div class="p-8 mb-5 border" data-country="Puerto Rico" data-curriculum="Software Carpentry (Shell, Git, R for Reproducible Scientific Analysis)" data-meeting="In Person" data-program="Software Carpentry">
<div class="flex mb-4 -mx-2">
<div class="flex items-center mx-2">
<img alt="" class="mx-1" src="/software.svg"/>
<span class="text-[0.625rem] uppercase">
Software Carpentry
</span>
</div>
<div class="flex items-center mx-2">
<img alt="" class="mr-1" height="20" src="/flags/pr.png" width="20"/>
<span class="text-[0.625rem] uppercase">
Puerto Rico
</span>
</div>
<div class="flex items-center mx-2">
<img alt="" class="mx-1" src="/In-Person.svg"/>
<span class="text-[0.625rem] uppercase">
In Person
</span>
</div>
</div>
<h3 class="title text-base md:text-[1.75rem] leading-[2.125rem] font-semibold">
<a class="underline hover:text-blue-hover text-gray-dark" href="https://dept-ccom-uprrp.github.io/2025-06-04-uprrp-r/">
University of Puerto Rico
</a>
</h3>
<div class="mb-5 text-lg font-semibold text-gray-mid">
Software Carpentry (Shell, Git, R for Reproducible Scientific Analysis)
</div>
<div class="mb-2 text-xs">
<strong class="font-bold">
Instructors
</strong>
:
<span class="instructors">
Humberto Ortiz-Zuazaga, Airined Montes Mercado
</span>
</div>
<div class="mb-4 text-xs">
<strong class="font-bold">
Helpers
</strong>
:
<span class="helpers">
Isabel Rivera, Diana Buitrago Escobar, Yabdiel Ramos Valerio
</span>
</div>
<div class="text-sm font-semibold text-gray-mid">
Jun 04 - Jun 10 2025
</div>
</div>Taking a careful look, we can start to detect where the information we want is located and how to extract it in a structured way.
We already know the workshop host organization is inside the
<h3> element, and from there we can also get the
hyperlink to that specific workshop’s website. Within the parent
<div>, we can extract additional details such as the
curriculum, country, format (in-person or online), and program (Software
Carpentry, Data Carpentry, Library Carpentry, The Carpentries).
As shown in the previous episode, we can store all this information in a Python dictionary, which we can later transform into a Pandas DataFrame for easier analysis.
PYTHON
# Create an empty dictionary and fill it with the info we are interested in
dict_workshop = {}
dict_workshop['host'] = div_firsth3.find('h3').get_text()
dict_workshop['link'] = div_firsth3.find('h3').find('a').get('href')
dict_workshop['curriculum'] = div_firsth3.get('data-curriculum')
dict_workshop['country'] = div_firsth3.get('data-country')
dict_workshop['format'] = div_firsth3.get('data-meeting')
dict_workshop['program'] = div_firsth3.get('data-program')Ok, that’s the code for extracting information about the first workshop listed, but what about all other workshops? Loop time!
We’ll use the same logic of the previous code block. But first, we’ll find all elements with the class “p-8 mb-5 border”, which we know are the containers for each workshop.
PYTHON
# Find all divs that match a class attribute
divs = soup.find_all('div', class_="p-8 mb-5 border")
# Create an empty list, and fill it with info on each of the workshops found
workshop_list = []
for item in divs:
dict_workshop = {}
dict_workshop['host'] = item.find('h3').get_text()
dict_workshop['link'] = item.find('h3').find('a').get('href') # get is used to access attribute values as a dictionary
dict_workshop['curriculum'] = item.get('data-curriculum')
dict_workshop['country'] = item.get('data-country')
dict_workshop['format'] = item.get('data-meeting')
dict_workshop['program'] = item.get('data-program')
workshop_list.append(dict_workshop)
# Transform list into a DataFrame
upcomingworkshops_df = pd.DataFrame(workshop_list)Great! We’ve finished our first scraping task on a real website. Be
aware that there are multiple ways of achieving the same result. For
example, instead of finding the div elements with the “p-8
mb-5 border” class attribute, we can find the container of all the
workshops, a div with a class attribute of “filtered”.
Then, we can use a while loop across all its children, each of these
being one workshop container. The rest of the code would be the
same.
PYTHON
# Find the container of all the workshops
container = soup.find('div', class_="filtered")
# Use the .contents property to get all the children, and accessing the first element
child_div = container.contents[0]
workshop_list = []
# Create an empty list, and fill it with info on each of the workshops found
while child_div is not None:
dict_workshop = {}
dict_workshop['host'] = child_div.find('h3').get_text()
dict_workshop['link'] = child_div.find('h3').find('a').get('href')
dict_workshop['curriculum'] = child_div.get('data-curriculum')
dict_workshop['country'] = child_div.get('data-country')
dict_workshop['format'] = child_div.get('data-meeting')
dict_workshop['program'] = child_div.get('data-program')
workshop_list.append(dict_workshop)
# Next iteration of the loop will be with the next sibling
child_div = child_div.next_sibling
# Transform list into a DataFrame
upcomingworkshops_df = pd.DataFrame(workshop_list)
upcomingworkshops_dfA key takeaway from this exercise is that, when we want to scrape data in a structured way, we have to spend some time getting to know how the website is structured and how we can identify and extract only the elements we are interested in.
Challenge
Extract the same information as in the previous exercise, but this time from the Past Workshops Page at https://carpentries.org/past_workshops/. Which 5 countries have held the most workshops, and how many has each held?
We can reuse directly the code we wrote before, changing only the URL we got the HTML from.
PYTHON
# Get HTML and parse it with BeautifulSoup
url_past = 'https://carpentries.org/workshops/past-workshops/'
req_past = requests.get(url_past).text
soup_past = BeautifulSoup(req_past, 'html.parser')
# Find all divs that match a class attribute
divs_past = soup_past.find_all('div', class_="p-8 mb-5 border")
# Create an empty list, and fill it with info on each of the workshops found
workshop_list = []
for item in divs_past:
dict_workshop = {}
dict_workshop['host'] = item.find('h3').get_text()
dict_workshop['link'] = item.find('h3').find('a').get('href')
dict_workshop['curriculum'] = item.get('data-curriculum')
dict_workshop['country'] = item.get('data-country')
dict_workshop['format'] = item.get('data-meeting')
dict_workshop['program'] = item.get('data-program')
workshop_list.append(dict_workshop)
# Transform list into a DataFrame
pastworkshops_df = pd.DataFrame(workshop_list)
print('Total number of workshops in the table: ', len(pastworkshops_df))
print('Top 5 of countries by number of workshops held: \n',
pastworkshops_df['country'].value_counts().head())Challenge
From the same upcoming workshops website, modify the code to also extract the list of instructors, helpers, and the dates of the workshops.
Instructors appear to be inside a span element
identified with the “instructors” class attribute. Similarly for
helpers. Workshop dates are inside a div element, with a
class attribute of value “text-sm font-semibold text-gray-mid”. We only
need to add three lines to our loop, and this is how it would look
like.
PYTHON
for item in divs:
dict_workshop = {}
dict_workshop['host'] = item.find('h3').get_text()
dict_workshop['link'] = item.find('h3').find('a')['href']
dict_workshop['curriculum'] = item.get('data-curriculum')
dict_workshop['country'] = item.get('data-country')
dict_workshop['format'] = item.get('data-meeting')
dict_workshop['program'] = item.get('data-program')
dict_workshop['instructor'] = item.find('span', class_ = "instructors").get_text() if item.find('span', class_ = "instructors") is not None else ''
dict_workshop['helper'] = item.find('span', class_ = "helpers").get_text() if item.find('span', class_ = "helpers") is not None else ''
dict_workshop['date'] = item.find('div', class_ = "text-sm font-semibold text-gray-mid").get_text()
workshop_list.append(dict_workshop)You’ll notice the extra if ... else statements in the
instructor and helper extraction. This avoids the code to show an error
if the instructors or helpers are not listed in the workshop, and
therefore BeautifulSoup can find them in the HTML.
Automating data collection
Until now, we’ve only scraped one website page at a time. However,
sometimes the information you need is spread across multiple pages, or
you may need to follow a trail of hyperlinks. With the tools we’ve
learned so far, handling this task is straightforward. You would simply
add a loop that navigates to each page, fetches the HTML using the
requests package, and parses it with
BeautifulSoup to extract the necessary data.
An important consideration when doing this is to include a wait time between each request to avoid overloading the web server providing the data. Sending too many requests in a short period can disrupt access for other users or even cause the server to crash. If the website detects excessive requests, it might block your IP address to visit the website or, in extreme cases, take legal action.
To prevent this, you can use Python’s built-in time
module and its sleep() function to pause between requests.
The sleep() function makes Python wait for a specified
number of seconds before moving on to the next line of code. For
example, the following code pauses for 10 seconds between each print
statement.
Let’s incorporate this important principle as we extract additional
information from each workshop’s individual website. We already have our
upcomingworkshops_df DataFrame, which includes a
link column containing the URL for each workshop’s webpage.
For example, let’s make a request to retrieve the HTML of the first
workshop in the DataFrame and take a look.
PYTHON
# Get the first link from the upcominworkshops dataframe
first_url = upcomingworkshops_df.loc[0, 'link']
print("URL we are visiting: ", first_url)
# Retrieve the HTML
req = requests.get(first_url).text
cleaned_req = re.sub(r'\s*\n\s*', '', req).strip()
# Parse the HTML
soup = BeautifulSoup(cleaned_req, 'html.parser')If we explore the HTML using the ‘View page source’ or ‘Inspect’
tools in the browser, we notice something interesting inside the
<head> element. Because this information is within
<head> rather than the <body>, it
won’t be displayed directly on the page, but the
<meta> elements provide metadata that helps search
engines better understand, display, and index the page.
Each <meta> tag contain useful information for our
workshop table, for example, such as well-formatted start and end dates,
the exact location with latitude and longitude (for in-person
workshops), the language of instruction, and a structured listing of
instructors and helpers. These data points can be identified by the
“name” attribute of the <meta> tags, with the desired
information stored in their “content” attributes.
The following code automates extracting this data from each
workshop’s website, but only for the first five workshops in our
upcomingworkshops_df DataFrame. We limit it to five to
avoid sending too many requests at once and overwhelming the server,
though we could extend this to all workshops if needed.
PYTHON
# List of URLs in our dataframe
urls = list(upcomingworkshops_df.loc[:5, 'link'])
# Start an empty list to store the different dictionaries with our data
list_of_workshops = []
# Start a loop over each URL
for item in tqdm(urls):
# Get the HTML and parse it
req = requests.get(item).text
cleaned_req = re.sub(r'\s*\n\s*', '', req).strip()
soup = BeautifulSoup(cleaned_req, 'html.parser')
# Start an empty dictionary and fill it with the URL, which
# is our identifier with our other dataframe
dict_w = {}
dict_w['link'] = item
# Use the find function to search for the <meta> tag that
# has each specific 'name' attribute and get the value in the
# 'content' attribute
dict_w['startdate'] = soup.find('meta', attrs = {'name': 'startdate'}).get('content')
dict_w['enddate'] = soup.find('meta', attrs = {'name': 'enddate'}).get('content')
dict_w['language'] = soup.find('meta', attrs = {'name': 'language'}).get('content')
dict_w['latlng'] = soup.find('meta', attrs = {'name': 'latlng'}).get('content')
dict_w['instructor'] = soup.find('meta', attrs = {'name': 'instructor'}).get('content')
dict_w['helper'] = soup.find('meta', attrs = {'name': 'helper'}).get('content')
# Append to our list
list_of_workshops.append(dict_w)
# Be respectful, wait at least 3 seconds before a new request
sleep(3)
extradata_upcoming_df = pd.DataFrame(list_of_workshops)Challenge
It’s possible you encountered an error when running the previous code block. The most likely cause is that the URL you tried to access doesn’t exist. This is known as a 404 error, which means the requested page cannot be found on the web server.
How would you approach handling this kind of error to make your scraping process more robust?
A straightforward Pythonic way to handle errors when accessing URLs is to use a try-except block. This allows you to catch any exceptions that occur when trying to access a URL, ignore the problematic URL, and continue processing the rest.
A cleaner approach is to check the actual HTTP response code returned
by the requests call. A status code of 200 means the
request was successful and the page exists. For any other response code,
you can choose to skip scraping that page and optionally log the code
for review.
- Use the requests package with
requests.get('website_url').textto retrieve the HTML content of any website. - In your web browser, you can explore the HTML structure and identify elements of interest using the “View Page Source” and “Inspect” tools.
- An HTML document is a nested tree of elements; navigate it by
accessing an element’s children (
.contents), parent (.parent), and siblings (.next_sibling,.previous_sibling) - To avoid overwhelming a website’s server, add delays between
requests using the
sleep()function from Python’s built-intimemodule.
Content from Dynamic websites
Last updated on 2026-01-15 | Edit this page
Estimated time: 35 minutes
Overview
Questions
- What are the differences between static and dynamic websites?
- Why is it important to understand these differences when doing web scraping?
- How can I start my own web scraping project?
Objectives
- Use the
Seleniumpackage to scrape dynamic websites. - Understand the usual pipeline of a web scraping project.
Visit this practice webpage created by Hartley Brody for learning and practicing web scraping: https://www.scrapethissite.com/pages/ajax-javascript/ (but first, read the terms of use). Select “2015” to display that year’s Oscar-winning films. Now try viewing the HTML behind the page, either using the View Page Source tool in your browser or by using Python with the requests and BeautifulSoup packages, as we’ve learned.
Can you find the Best Picture winner Spotlight anywhere in the HTML? Can you find any of the other movies or the data from the table? If not, how could you scrape this page?
When you explore a page like this, you’ll notice that the movie data (including the title Spotlight) isn’t present in the initial HTML source. That’s because the website uses JavaScript to load the information dynamically. JavaScript is a programming language that runs in your browser and allows websites to fetch, process, and display content on the fly — often in response to user actions, like clicking a button.
When you select “2015”, your browser runs JavaScript (triggered by
one of the <script> elements in the HTML) to retrieve
the relevant movie information from the web server and dynamically
update the table. This makes the page feel more interactive, but it also
means that the initial HTML you see doesn’t contain the movie data
itself.
You can observe this difference when using the “View page source” and “Inspect” tools in your browser: “View page source” shows the original HTML sent by the server, before any JavaScript runs. “Inspect” shows the rendered HTML, after JavaScript has executed and updated the page content.
Because the requests package only retrieves the original source HTML,
it won’t work for scraping pages like this. To scrape content that is
generated dynamically by JavaScript, we’ll use a different tool: the
Selenium package.
Using Selenium to scrape dynamic websites
Selenium is an open-source project for web browser automation. It’s especially useful for scraping tasks because it behaves like a real user interacting with a web page in a browser.
With Selenium, the browser actually renders the page, allowing JavaScript to run and load any dynamic content. This means we can access the fully loaded HTML (just like we’d see using the “Inspect” tool) after JavaScript has executed.
In addition, Selenium can simulate real user interactions like filling in text boxes, clicking buttons, scrolling, or selecting items from drop-down menus. These features are essential when scraping dynamic websites.
To get started, we’ll load the webdriver and
By components from the selenium package:
webdriverlets us launch or simulate a web browser and interact with it through code.Byhelps us specify how we want to locate elements in the HTML, by tag name (By.TAG_NAME), class (By.CLASS_NAME), ID (By.ID), name (By.NAME), and more.
We’ll also continue using the other packages introduced in the previous episode.
PYTHON
# Loading libraries
from bs4 import BeautifulSoup
import pandas as pd
from time import sleep
from selenium import webdriver
from selenium.webdriver.common.by import BySelenium can simulate different browsers like Chrome, Firefox, Safari, and others. For now, we’ll use Chrome. When you run the following line of code, a new Google Chrome window will open. Don’t close it, this is the browser that Selenium is controlling to interact with the webpage.
Later in the lesson, we’ll learn how to run headless browser
sessions. Headless means the browser runs in the background without
opening a visible window or user interface, which is useful for
automation tasks and running scripts on servers. To direct the browser
to the Oscar winners page, use the .get() method on the
driver object we just created.
PYTHON
# Open a Chrome web browser driven by Selenium
driver = webdriver.Chrome()

# Go to a specific website
driver.get("https://www.scrapethissite.com/pages/ajax-javascript/")
How can we direct Selenium to click the “2015” text so the table for
that year appears? First, we need to locate that element, similar to how
we used .find() and .find_all() with
BeautifulSoup. In Selenium, we use .find_element() to get
the first matching element, and .find_elements() to get all
matches. However, the syntax for specifying search parameters is
slightly different.
For example:
To select the first
<table>element, you’d use:driver.find_element(by=By.TAG_NAME, value="table")To find a row with
<tr class="film">, you’d use:driver.find_element(by=By.CLASS_NAME, value="film")
To find the specific element that triggers the display of 2015’s Oscar winners, use the “Inspect” tool in Chrome. Right-click on the “2015” text and choose “Inspect.” In the DevTools panel, you’ll see this HTML element:
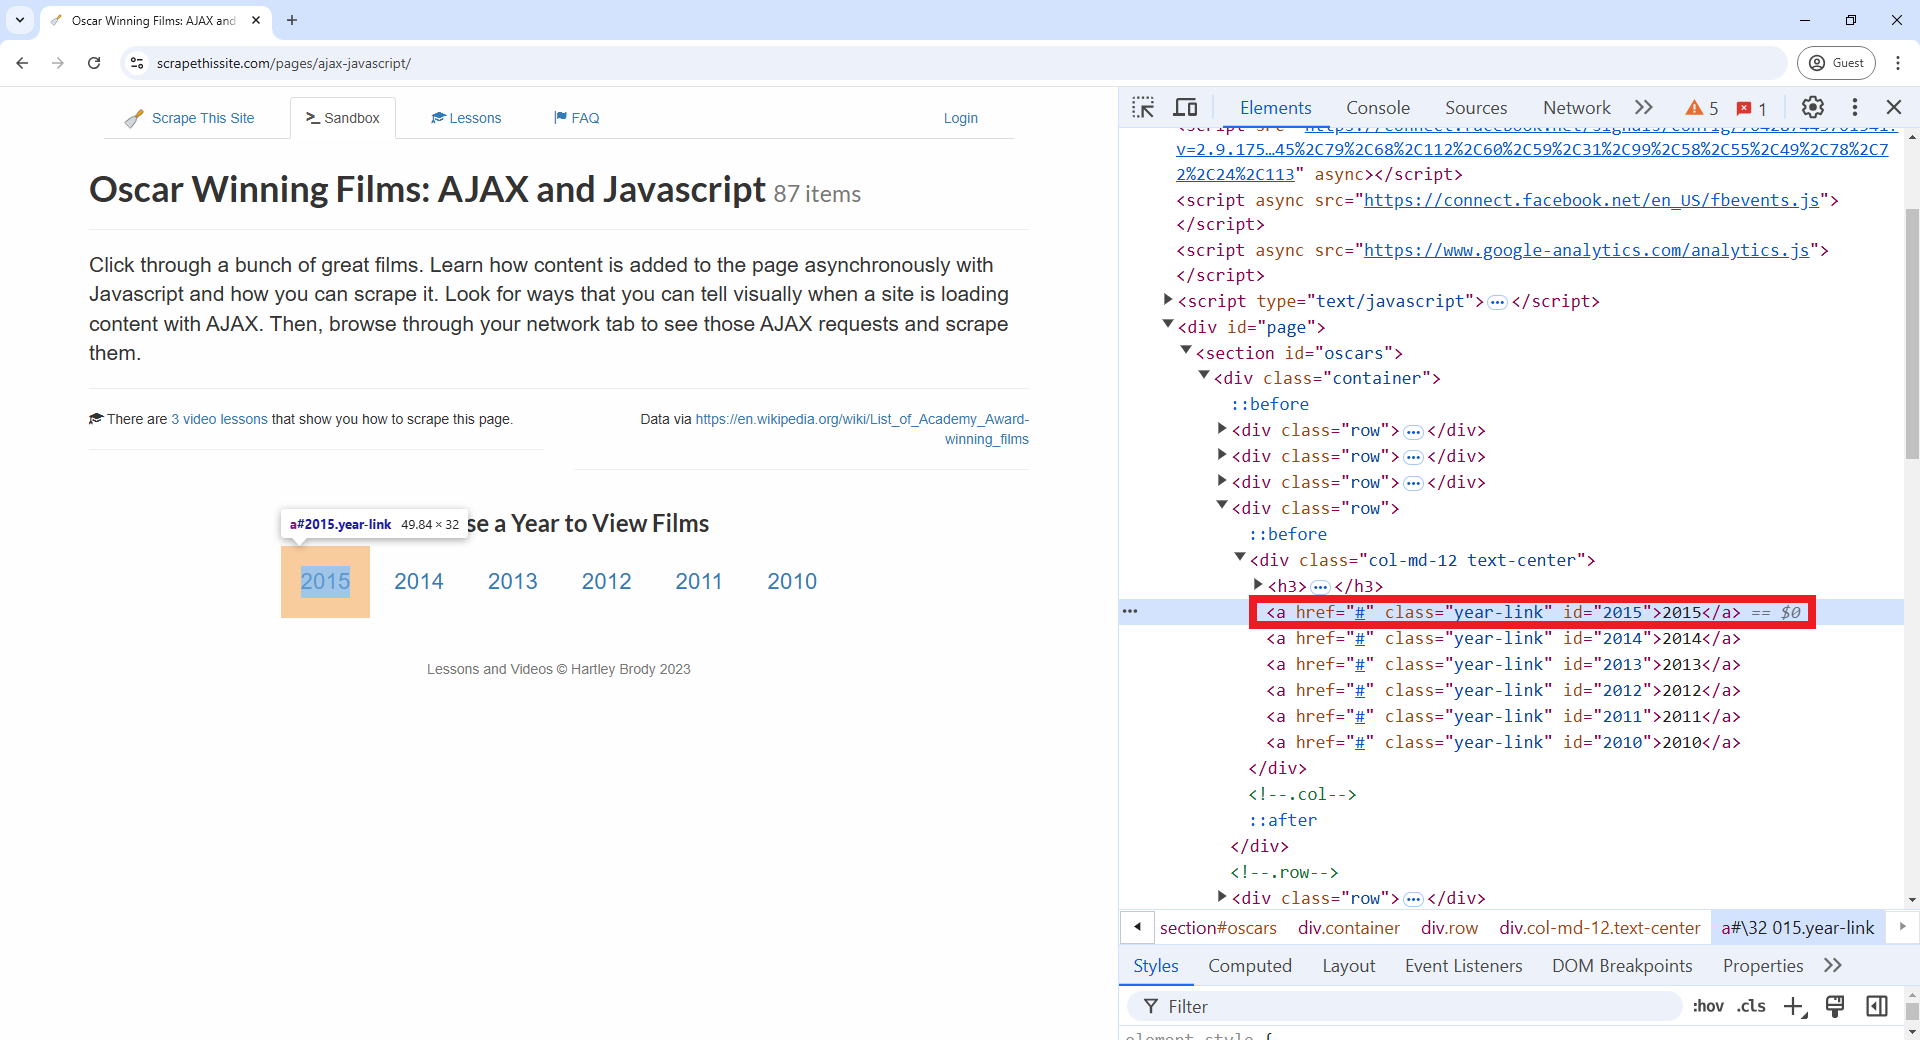
Because the id attribute is unique, we can select this
element directly using:
We’ve located the hyperlink element we need to click to display the
table for that year, and we’ll use the .click() method to
interact with it. Since the table takes a couple of seconds to load,
we’ll use the sleep() function to pause while the
JavaScript runs and the table loads. Next, we’ll use driver.page_source
to retrieve the updated HTML content from the website and store it in a
variable called html_2015. Finally, we’ll close the browser
window Selenium opened using driver.quit().
PYTHON
# Click 2015 button
button_2015.click()

# Wait for table to load
sleep(3)

# Retrieve page HTML
html_2015 = driver.page_source

# Close web browser
driver.quit()
Importantly, the HTML document we stored in html_2015
is the HTML after the dynamic content loaded. This
content wasn’t present in the original HTML and wouldn’t be accessible
if we had used the requests package alone.
While we could continue using Selenium’s .find_element()
and .find_elements() methods to extract the data, we’ll
switch back to BeautifulSoup to parse the HTML and locate elements,
since we already have practice with it. For example, if we search for
the first element with the class attribute “film” and retrieve its text,
we’ll see that the HTML now includes the movie “Spotlight.”
PYTHON
# Parse HTML and
soup = BeautifulSoup(html_2015, 'html.parser')
print(soup.find(class_='film').prettify())
OUTPUT
<tr class="film">
 <td class="film-title">
  Spotlight
 </td>
 <td class="film-nominations">
  6
 </td>
 <td class="film-awards">
  2
 </td>
 <td class="film-best-picture">
  <i class="glyphicon glyphicon-flag">
  </i>
 </td>
</tr>
The following code repeats the process of clicking and loading the 2015 data, but now in “headless” mode (meaning the browser runs in the background without opening a visible window). After the data loads, the code extracts information from the table one column at a time, using the fact that each column has a unique class attribute. Instead of writing traditional for loops to extract the text from each element returned by .find_all(), we use list comprehensions, which provide a more concise way to generate lists. You can learn more about them reading Python’s documentation on list comprehensions or this short tutorial by Programiz.
PYTHON
# Create the Selenium webdriver and make it headless
options = webdriver.ChromeOptions()
options.add_argument("--headless=new")
driver = webdriver.Chrome(options=options)

# Load the website. Find and click 2015. Get post JavaScript execution HTML. Close webdriver
driver.get("https://www.scrapethissite.com/pages/ajax-javascript/")
button_2015 = driver.find_element(by=By.ID, value="2015")
button_2015.click()
sleep(3)
html_2015 = driver.page_source
driver.quit()

# Parse HTML using BeautifulSoup and extract each column as a list of values ising list comprehensions
soup = BeautifulSoup(html_2015, 'html.parser')
titles_lc = [elem.get_text() for elem in soup.find_all(class_="film-title")]
nominations_lc = [elem.get_text() for elem in soup.find_all(class_="film-nominations")]
awards_lc = [elem.get_text() for elem in soup.find_all(class_="film-awards")]

# For the best picture column, we can't use .get_text() as there is no text
# Rather, we want to see if there is an <i> tag
best_picture_lc = ["Yes" if elem.find("i") == None else "No" for elem in soup.find_all(class_="film-best-picture")]

# Create a dataframe based on the previous lists
movies_2015 = pd.DataFrame(
    {'titles': titles_lc, 'nominations': nominations_lc, 'awards': awards_lc, 'best_picture': best_picture_lc}
)
Challenge
Using what we’ve learned in this episode, write a Python script that collects Oscar-winning film data for all years from 2010 to 2015 from Hartley Brody’s website. Hint: Reuse the code you wrote to scrape the 2015 data, and place it inside a loop that goes through each year.
In addition to looping through each year, the following solution changes the code by defining two functions: one that finds and clicks on a year and returns the HTML after the data loads, and another that takes this HTML, parses it, and extracts the data into a DataFrame.
To let you observe how Selenium opens the browser and interacts with the page, this version does not use the “headless” option.
PYTHON
# Function to search year hyperlink and click it
def findyear_click_gethtml(year):
    button = driver.find_element(by=By.ID, value=year)
    button.click()
    sleep(3)
    html = driver.page_source
    return html

# Function to parse html, extract table data, and assign year column
def parsehtml_extractdata(html, year):
    soup = BeautifulSoup(html, 'html.parser')
    titles_lc = [elem.get_text() for elem in soup.find_all(class_="film-title")]
    nominations_lc = [elem.get_text() for elem in soup.find_all(class_="film-nominations")]
    awards_lc = [elem.get_text() for elem in soup.find_all(class_="film-awards")]
    best_picture_lc = ["No" if elem.find("i") == None else "Yes" for elem in soup.find_all(class_="film-best-picture")]
    movies_df = pd.DataFrame(
        {'titles': titles_lc, 'nominations': nominations_lc, 'awards': awards_lc, 'best_picture': best_picture_lc, 'year': year}
    )
    return movies_df

# Open Selenium webdriver and go to the page
driver = webdriver.Chrome()
driver.get("https://www.scrapethissite.com/pages/ajax-javascript/")

# Create empty dataframe where we will append/concatenate the dataframes we get for each year
result_df = pd.DataFrame()

for year in ["2010", "2011", "2012", "2013", "2014", "2015"]:
    html_year = findyear_click_gethtml(year)
    df_year = parsehtml_extractdata(html_year, year)
    result_df = pd.concat([result_df, df_year])

# Close the browser that Selenium opened
driver.quit()
Challenge
If you’re ready for a break from scraping table data like we’ve done in the last two episodes, try this new exercise to practice working with dynamic websites. Visit this product page created by scrapingcourse.com and extract the name and price of each product, along with the hyperlink from each product card to its detailed view page.
Once you’ve done that, and if you’re up for an additional challenge, visit each product’s detail page and scrape its SKU, Category, and Description.
To identify the elements that contain the data you need, start by
using the “Inspect” tool in your browser. The screenshot below shows an
example from the website, where each product card is a
<div> element with several attributes that help
narrow down your search.

For instance, you can target these product cards by selecting
<div> elements with the attribute
'data-testid'='product-item'. Once you’ve found all the
relevant <div> elements, you can extract the
necessary information from each:
Hyperlink: This is the
hrefattribute of the<a>tag within each product card.Product name: This is inside a
<span>tag with the class attribute'product-name'.Price: This is also inside a
<span>tag, and we can identify it using the attribute'data-content'='product-price'.
PYTHON
# Open Selenium webdriver in headless mode and go to the desired page
options = webdriver.ChromeOptions()
options.add_argument("--headless=new")
driver = webdriver.Chrome(options=options)
driver.get("https://www.scrapingcourse.com/javascript-rendering")

# As we don't have to click anything, just wait for the JavaScript to load, we can get the HTML right away
sleep(3)
html = driver.page_source

# Parste the HTML
soup = BeautifulSoup(html, 'html.parser')
# Find all <div> elements that have a 'data-testid' attribute with the value of 'product-item'
divs = soup.find_all("div", attrs = {'data-testid': 'product-item'})

# Loop through the <div> elements we found, and for each get the href,
# the name (inside a <span> element with attribute class="product-name")
# and the price (inside a <span> element with attribute data-content="product-price"
list_of_dicts = []
for div in divs:
    # Create a dictionary to store the data we want for each product
    item_dict = {
        'link': div.find('a')['href'],
        'name': div.find('span', attrs = {'class': 'product-name'}).get_text(),
        'price': div.find('span', attrs = {'data-content': 'product-price'}).get_text()
    }
    list_of_dicts.append(item_dict)

all_products = pd.DataFrame(list_of_dicts)
We could arrive to the same result if we replace the for loop with list comprehensions. So here is another possible solution with that approach.
PYTHON
links = [elem['href'] for elem in soup.find_all('a', attrs = {'class': 'product-link'})]
names = [elem.get_text() for elem in soup.find_all('span', attrs = {'class': 'product-name'})]
prices = [elem.get_text() for elem in soup.find_all('span', attrs = {'data-content': 'product-price'})]
all_products_v2 = pd.DataFrame(
    {'link': links, 'name': names, 'price': prices}
)
The scraping pipeline
By now, you’ve learned the core tools for web scraping: requests, BeautifulSoup, and Selenium. Together, these tools form a powerful and flexible pipeline that can handle most scraping tasks. When starting a new scraping project, following a few key steps will help ensure you capture the data you need efficiently and responsibly.
The first step is to understand the structure of the website. Every site organizes its content differently, so take time to explore the page, inspect elements, and identify the HTML tags and attributes that hold the information you’re after.
Next, determine whether the content is static or dynamic. Static content is part of the initial HTML and can be accessed directly using requests and parsed with BeautifulSoup. Dynamic content, on the other hand, is loaded or updated by JavaScript after the initial page load, and typically requires Selenium to render the page fully before parsing.
Once you’ve identified how the content is delivered, build
your scraping pipeline. For static content, make a request
using requests.get() and pass the HTML to BeautifulSoup to
locate and extract the relevant elements. For dynamic pages, use
Selenium to open the page in a browser, interact with the page as needed
(e.g., clicking buttons, selecting dropdowns), and retrieve the updated
HTML with driver.page_source. Then use BeautifulSoup to
parse and extract the data.
Finally, clean, format, and store the data in a structured format, such as a list of dictionaries or a Pandas DataFrame, so it’s ready for analysis or export.
Following this pipeline helps you break down complex tasks into clear, manageable steps and choose the right tools for the job With practice, you’ll be able to adapt this process to scrape and organize data from a wide range of websites.
- Dynamic websites load content using JavaScript, so the data may not be present in the initial HTML. It’s important to distinguish between static and dynamic content when planning your scraping approach.
- The
Seleniumpackage and itswebdrivermodule simulates a real browser, allowing you to execute JavaScript and interact with the page as a user would —clicking, scrolling, or filling out forms - Key Selenium commands:
-
webdriver.Chrome(): Launch the Chrome browser simulator -
.get("website_url"): Visit a given website -
.find_element(by, value)and.find_elements(by, value): Locate one or multiple elements -
.click(): Click a selected element -
.page_source: Retrieve the full HTML after JavaScript execution -
.quit(): Close the browser
-
- The browser’s “Inspect” tool allows users to view the HTML document after dynamic content has loaded. This is useful for identifying which elements contain the data you want to scrape.
- A typical web scraping pipeline includes: 1) Understanding the website structure; 2) Determining whether content is static or dynamic; 3) Choosing the right tools (requests + BeautifulSoup or Selenium); 4) Extracting and cleaning the data; 5) Storing the data in a structured format.